The Basics in Crochet
Brand new to crochet? Start here: holding the hook and yarn, the slip knot, and your first chain.
Tap play and stitch along — or watch it over on YouTube.
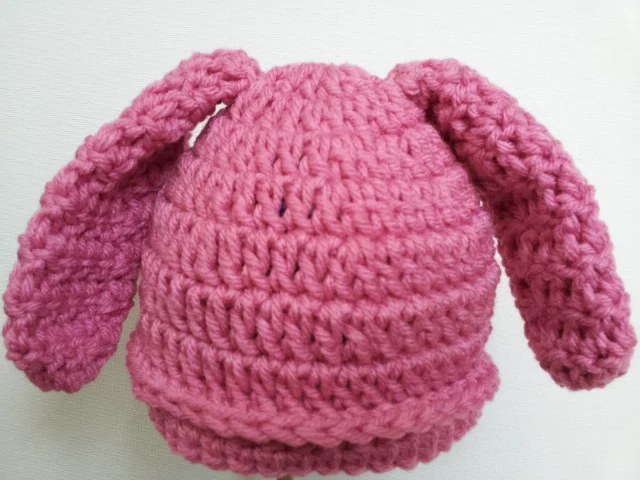
A bunny-ear baby hat sized for 0–3 and 3–6 months — a spring and Easter photo-prop favorite.
Hi everyone, This is a pattern that I have had available for several months and I have decided to offer it for free. With Easter and spring coming up before you know it, these make great photo props for the kiddos. The pattern is sized for 0-3 Months and 3-6 Months.
These hats are so simple to make! The download is available from my Ravelry store. Just click the download link and you can download the PDF file (which includes all pattern photos). Or, read the pattern below.
Enjoy!
PDF file from Ravelry - download now
Materials There are some basic materials needed to complete this pattern. You will need the following
supplies:
H or I Hook Scissors or Clippers 4 oz. of Worsted Weight Yarn (Approximately)
That's it!
Basic Instructions and Pattern Information
Difficulty Level:
Easy/Beginner
Size of the hats :
- 3 Months (14" circumference) - H Hook 3 - 6 Months (15" circumference) - I Hook *Please note that the hats stretch . A baby's head size may be 16" but they will fit into a crochet hat that has a smaller circumference.
*This pattern does assume that you know the basics of crochet and how to work the stitches in the
abbreviation chart.
Abbreviations
Chart :
SC = Single Crochet DC = Double Crochet SS = Slip Stitch CH = Chain R = Row Decrease and Increase Easy Baby Bunny Hat Pattern With appropriate
size hook (Refer to size chart), CH 5 and form ring.
R1 — CH 2, then put an additional 11 DC in the ring for a total of 12 stitches. This includes the first chain stitch. Join and CH 2.
R2 — 2 DC in each stitch around. Join and CH 2.
R3 — DC in the first stitch. 2 DC in the next stitch (increase). DC in the next two stitches. 2 DC in the next stitch. Continue to increase every third stitch until you reach the starting point. Join and CH 2.
R4 — DC in the first two stitches. 2 DC in the next stitch (increase). DC in the next three stitches. 2 DC in the next stitch. Continue to increase every fourth stitch until you reach the starting point. Join and CH 2.
R5 — DC in the first three stitches. 2 DC in the next stitch (increase). DC in the next four stitches. 2 DC in the next stitch. Continue to increase every fifth stitch until you reach the starting point. Join and CH 2.
R6 and R7 — DC in each stitch around until you reach the starting point. Join and CH 2.
R8 — DC in each stitch around until you reach the starting point. Join and CH 1 (CH 2 if making 3-6 month size).
*Note - If you are making the larger size hat (3-6 months) with the I hook, add an extra row here.
Just DC in each stitch around until you reach the starting point. Join and CH 1.
R9 — Working in back loops only for this row , SC in each stitch around until you reach the starting point. Join and CH1.
R10 — SC in each stitch around until you reach the starting point. Join and tie off. Weave the excess yarn into the back of the hat.
Ears :
Make Two CH 4 and form Ring.
R1 — CH 2 and put an additional 11 DC in the ring. This will give you a total of 12 stitches in the ring.
R2 — R6 - DC in each stitch around. Join and CH 2.
*Note - At this point, turn the ear inside out (which is actually right side out).
R7 — Skip the first stitch and DC in the next stitch (decrease). DC in each stitch around until you reach the last stitch. Skip the last stitch. Join and CH 2.
R8 — Skip the first stitch and DC in the next stitch (decrease). DC in each stitch around until you reach the last stitch. Skip the last stitch. Join and tie off. Leave a long end. You can use it help tie on the ears.
Tying on the ears :
Step 1 — Cut four long strands of yarn and weave them into the ends of the ear.
Step 2 — Center the hat and place the ears at approximately the area seen in the picture. It is two rows down from the top (See picture).
Step 3 — Using your crochet hook to help, weave the ends of the yarn strands into the center of the hat. Tie off inside the hat with a triple knot. (It is easier to do one section at a time.)
Tie on both ears and your hat should look like this finished picture.
Happy Hooking!
Please feel free to share this pattern on Pinterest, Facebook, Twitter, below!

Poochie Baby is a cozy corner for crochet lovers — sweet patterns for babies, blankets and your home, with step-by-step tutorials that feel like a friend sitting beside you.


Crochet a little game-day favorite with Football Beanie Hat: Crochet Hat Pattern by Poochie Baby! Contrasting stripes and stitched white football laces give this cozy baby hat its sporty charm.

I've been crocheting since I was 7 years old. What started as a hobby in 2006 turned into Poochie Baby — first selling on eBay, then Etsy, and now in my own little Poochie Baby shop.
Whether you're picking up a hook for the very first time or you've been crocheting forever, there's a chair pulled up for you here.
New patterns, shop news, and craft ideas — no spam, ever!
Unsubscribe anytime.
One page for every free pattern video on the Poochie Baby YouTube channel (@mypoochiebaby) — open a pattern to watch its video right on the page, with the written pattern right underneath where there is one. Plenty of freebies are written-pattern only, no video needed.
tap a pattern to open its page…Nothing in this pile yet — try another category!
Easy craft projects to make and gift.
make something todayNo craft projects are listed yet — check back soon!
Pattern books and ebooks — each book links out to the retailer.
for your craft shelfYarn, hooks and notions — links out to the retailer where you can pick them up.
my real-life favoritesBasic and foundational crochet stitches — the very stitches nearly every pattern is built from, one friendly video at a time.
start at the very beginning…Do you want to learn to crochet?
Many years ago I made a set of instructional videos for my YouTube channel. Even though these videos are older now, crochet techniques don't change — everything in them still works exactly the same today.
When you're first learning, I recommend a cheap, sturdy yarn. Specialty yarn takes some experience, because you first need to get the feel of tension and gauge. The yarn I'd reach for while learning is Red Heart Super Saver — easy to find at your local Walmart, Michaels, or on Amazon.
For hooks, I recommend Clover Hooks. Believe me — your hands and wrists will thank me for this.
now, follow along to learn how to crochet!
Brand new to crochet? Start here: holding the hook and yarn, the slip knot, and your first chain.
Tap play and stitch along — or watch it over on YouTube.
Lesson one: the chain stitch — the foundation almost every crochet project starts with.
Tap play and stitch along — or watch it over on YouTube.
Lesson two: the single crochet — the sturdy little stitch amigurumi is made of.
Tap play and stitch along — or watch it over on YouTube.
Half double crochet: the friendly middle stitch — part single, part double, all useful.
Tap play and stitch along — or watch it over on YouTube.
The double crochet stitch, step by step — the tall stitch that half of all patterns are built on.
Tap play and stitch along — or watch it over on YouTube.
Treble (triple) crochet, step by step — the tallest of the basic stitches, made simple.
Tap play and stitch along — or watch it over on YouTube.
Poochie Baby is back in the crochet business, so be on the lookout for more instructional videos and tutorials on YouTube.
happy crocheting!New patterns, shop news, and craft ideas — no spam, ever!
Unsubscribe anytime.
Everything on the site in one place — posts, patterns, books, products, stats and the hero photo.
Your live site editor. This Admin page is not linked from the public site or footer; it opens only at its direct address (thepoochiebaby.com/admin) and asks for your password. Two ways to run things: ask me in chat (“add this pattern…”) and I’ll take care of it — or edit right here yourself. Anything you save here is published to the live site for every visitor, straight away.
in this preview.This can’t be undone.